


Home | Applications | DietCalendar Ladys
DietCalendar Ladys
DietCalendar Ladys is the application for women that have both functions of our LadysCalendar's and DietCalendar!
You can manage your diet and menstruation with one app, DietCalendar Ladys!
Users of DietCalendar and LadysCalendar: From Menu → Backup → Export SDcard, save the existing data of DietCalendar and LadysCalendar. Open DietCalendar Ladys → Menu → Backup → Import LadysCalendar or DietCalendar and OK.
Added a new backup function Export Cloud! You can save, send and retrieve your data by using "Gmail" and "Google Drive". Please click Here to check the detailed description.
DietCalendar Ladys Howto Guide
 Modifications
 Added a new backup function Export Cloud!
Menu Button
❶ 「BaseSetting」:Set and edit your menstrual cycle and period.
❷ 「Password」:Set a password.
❸ 「Mark」:You can add marks on each day of the calendar.
❹ 「Setting Mark」:You can customize the list of marks.
❺ 「Setting」:Set start week and vibration etc...
❻ 「More」:
「Backup」:
-----Import SD card: Import data from SD card.
-----Export SD card: Export data to SD card.
-----Import LadysCalendar: Import data from LadysCalendar.
-----Import DietCalendar: Import data from DietCalendar.
-----Export Cloud:You can backup data to Google Drive and Dropbox.*Please install either software from the market.
「Copy to SD card」:Copy the data to internal and external SD card.
Recovery: Use this function when you want to return to the previous data. *Please note that the current data will be deleted when you use this function.
「Help」:Launch the help menu.
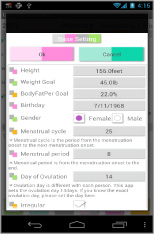
- *Initial Window*
 Enter and save User information first.
 Set your menstrual period and cycle.
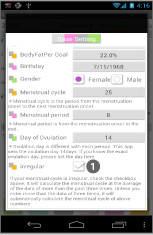
- If your menstrual cycle is irregular, check the checkbox above. Save more than the data of three times to calculate the avarage.
- After entering all the information, press "OK" button to save.
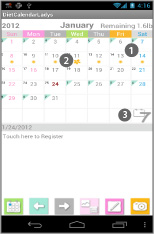
- After saving the Basesetting, go back to the calendar.
- Green triangle in the corner is shown the menstrual period.
- Orange dots and flower show days of ovulation.
 Switch the calendar display to weekly.
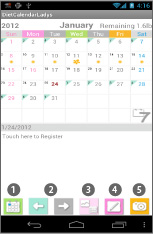
- 「Today」button: go back to today's date.
- 「Left」&「Right」button: move the date right and left.
- 「Graph&List」button: select Graph or List to display.
 「Temperature」button: a calculator will be displayed. Enter the temperature → OK.
 「Camera」button: save the photos of today's meal or anything.
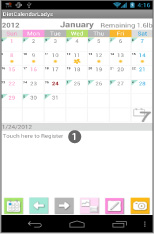
- To save the daily data, tap the screen "Touch here to Register".
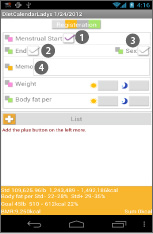
- *Registeration Window*
- 「Menstrual Start」: check here when the period starts.
- 「End」: check here when the period ends.
- 「Sex」: when you check here, ♡mark will be displayed on the date.
- 「Memo」: keep memos or use this memo as a journal.
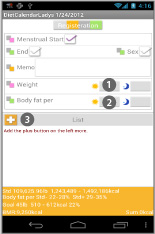
- 「Weight」: you can save morning and night data.
- 「Body fat per」: you can save morning and night data.
- Press Plus button of List. Move to "Detailed" window. You can add more photos here, save memos for the photo and save the calories of what you have eaten.
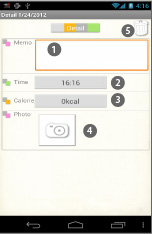
- "Detailed" window.
- Save memo about the photo.
- You can see the time that the photo was taken.
- Save the calories of the food.
- Press this icon to take a photo.
- Delete button.
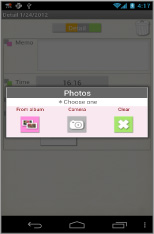
- Photo upload window. Select 「From Album」or 「Camera」to save photos.Press Clear button to delete the photo.
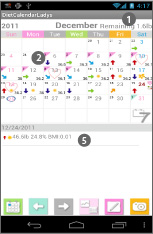
- The remaining of your target weight will displayed on the top-right corner of the screen.
- When you check 「Menstrual Start」on Registeration Window, green triangle of the corner will turn to pink.
- There are 4 different types of arrow to show the fluctuation of the weight on the date.
- When you enter the temperature, it will displayed right-bottom corner of the date.
- You can see now the data you have saved reflected on the calendar.

- There are so many marks on the list so here, you can customize the mark list by selecting only marks you want to use.
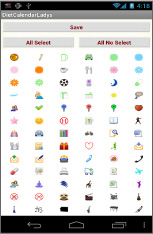
- When the mark list is opened, all marks are selected.
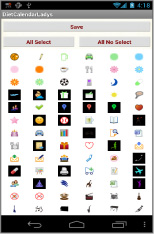
- Tap marks that you don't need to use. Background of a mark will turn to black. Which means, it is deselected.
- Save with “Save” button.

- *How to add marks*
- You can add marks on the calendar to organize other plans!
- Menu button → Mark.
- Press「Mark」or「Mark2」button and select a mark then tap the date.
- *Delete Marks*
- When you want to delete a mark immediately after adding the mark, press the mark twice.
- When you want to delete a mark you have added before, select the same mark and then tap the mark.
 Click the link below to download DietCalendar Ladys from your mobile.(To download DietCalendar Ladys, open our website with your mobile and tap the right link.) DietCalendar Ladys DietCalendar Ladys Free
Click QR cord below. The link to the Android market will be sent your mobile.Tap the QR cord if you visit our website with your mobile.
 DietCalendar Ladys
 DietCalendar Ladys Free